
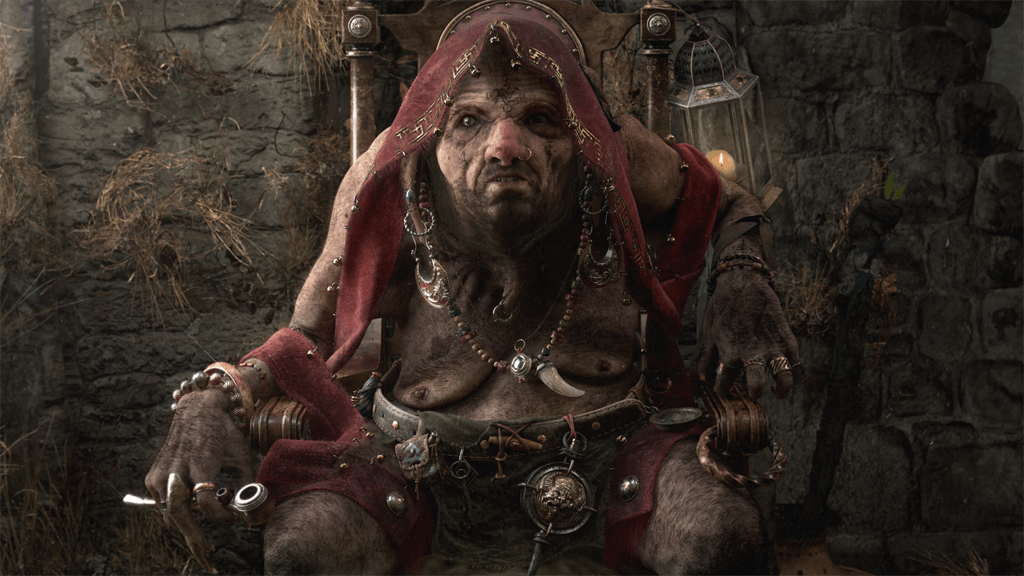
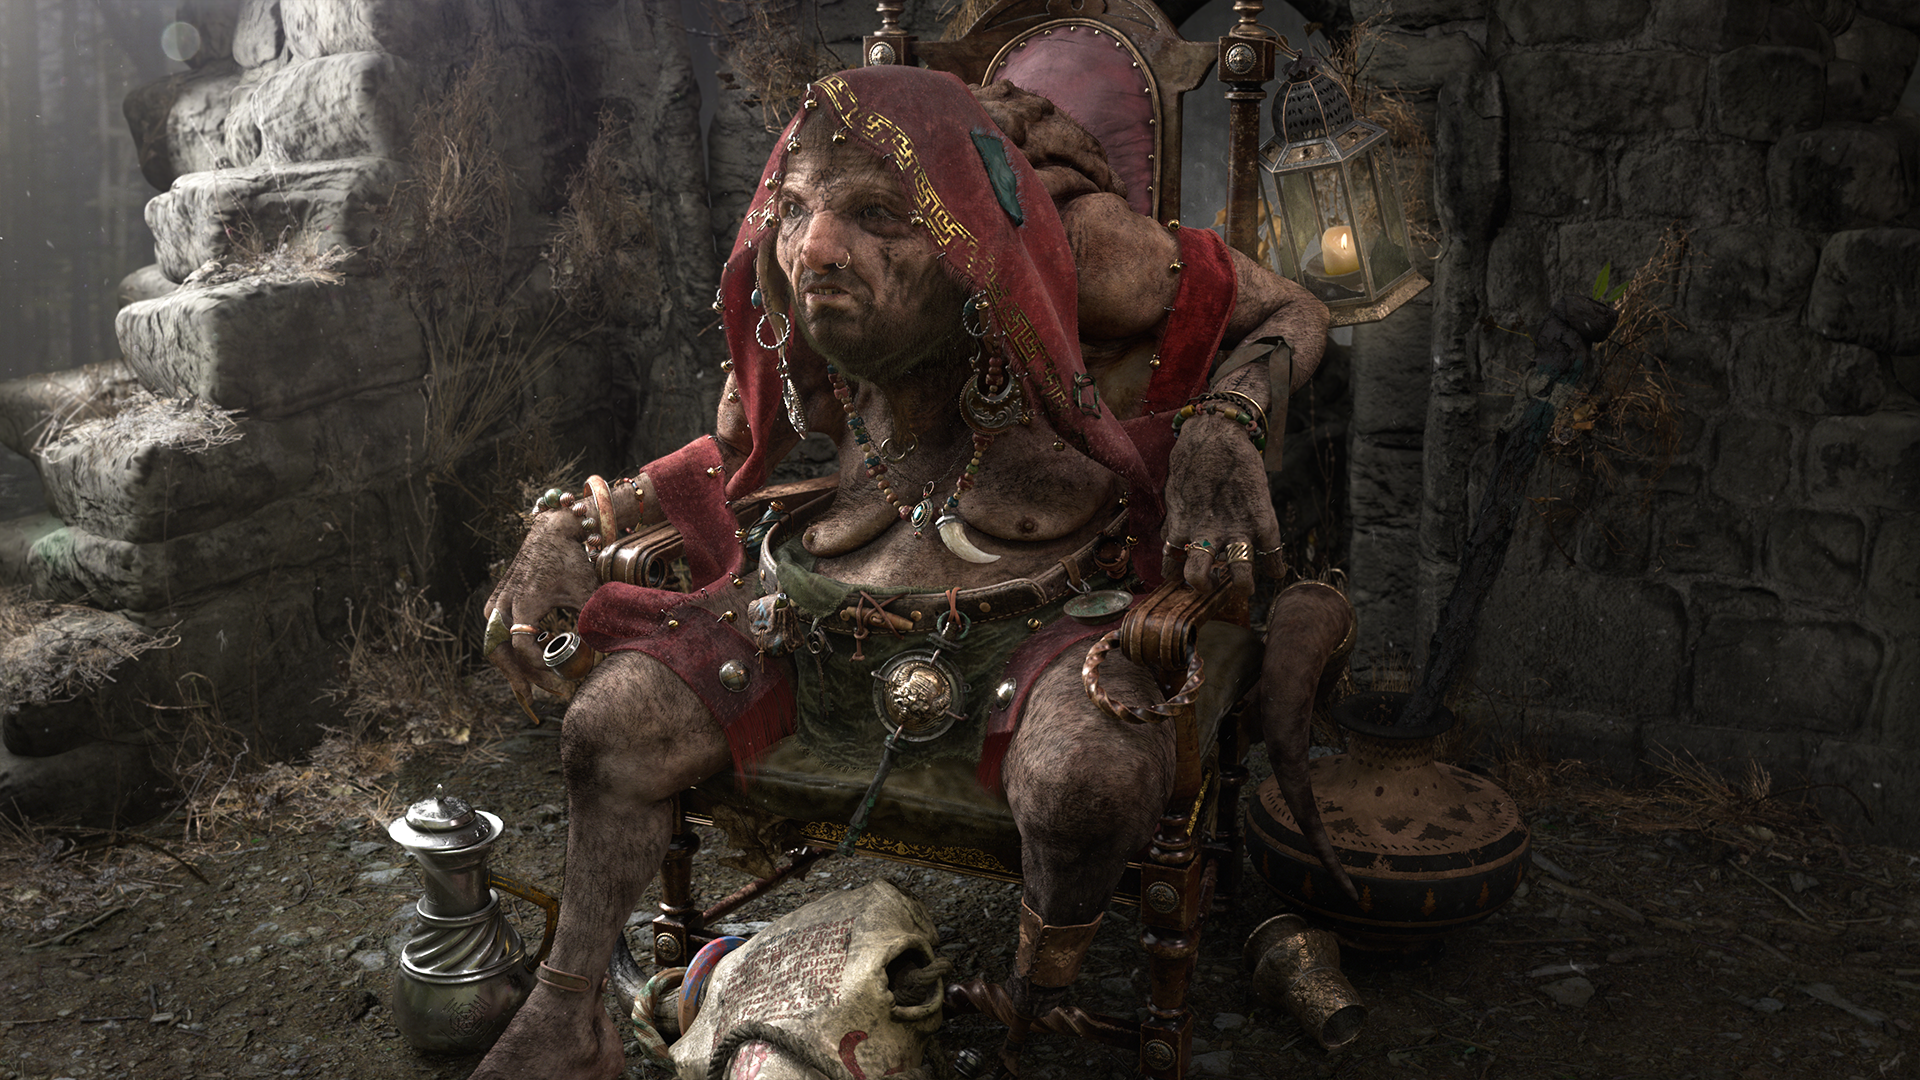
If you’ve been cruising ArtStation, 3D Total or Zbrush Central, you may have come across Marco Gifuni’s The Hermit. Initially a scene named The Oracle, Marco wanted to create a character like an ancient oracle, complete with props in front of it to enable it to predict the future. Before we dive in to how he created it, let’s first get to know Marco :
An Italian freelance generalist currently based in London. Marco has had a great, lifelong passion for illustration and art, with a focus on characters. He was doing illustration and character design until a friend told him -in 2003- that you could create 3D text in software. And it wasn’t MS Word, either. Despite this somewhat underwhelming pitch, the software turned out to be Cinema 4D, an application he’s not stopped using since. When asked about how he ended up working in 3D, Marco told us:
“I've always loved the idea of being able to translate sketches into a 3d world, and I think unlike any other medium, 3d programs give you the possibility to tell a story with much more depth and vibrancy than 2D mediums. After studying 3d at the University of Valle Giulia in Rome, I moved to London at 24 (10 years ago), and I started working almost immediately: For years I've been stuck in jobs I didn't find particularly interesting, mostly digital and advertising. In the meantime, I daily bombarded companies with emails. And the number of rejections I got was incredible. Despite this, I finally managed to get my first freelance gig for a motion graphics project on a tv series. Needless to say, I was over the moon.”
But how did you start getting work? Any lessons learned? “I always got work, the problem was that it was work which did not appeal to me, like digital and advertising. I started to realise I was slowly moving away from 3d and basically wasting my time in the loop of "it’s a terrible job, but it pays the bills". This is why I started contacting vfx and motion studios and subsequently was lucky enough to get my first gig as well as some other freelance work. My lessons learned are that freelancing teaches you stuff every single day. Especially in London where the level is incredibly high and demanding as well as the fact that a lot of times you get to work with basically the best people in the industry. So, you have to always bring your best, and learn fast. I'd say one of the most valuable lessons learned is to not take things personally – which I am still working on! Our job involves a hell of a lot of rounds of amends and repetition, to the point that you start doubting yourself and your skills. 90% of the times you really can't prevent or predict what the client or producers have got in mind, so the only reasonable thing to do is keep calm and keep going”.
Of course, we then had to ask what actually keeps him going – work habits, buzzkillers – or igniters?
“My earphones. Music helps me concentrate. I mainly listen to rock and metal or podcasts these days. As forbuzzkillers, I’ve never been a fan of minimalism - rather the opposite. I've always been an avid fan of art, painting and illustration in general, I spend a lot of time in museums and galleries, so a lot of inspiration comes from that I suppose. In particular, I've been a fan (more like a groupie!) of Alphonse Mucha and Art Nouveau since I was a kid, I really love when a work digital or otherwise, is packed full details and hidden Easter eggs, gives a different flavour to the composition.”
And this is actually something you can see in the Hermit for yourself If you give yourself a little time to explore the image. As Marco explains:
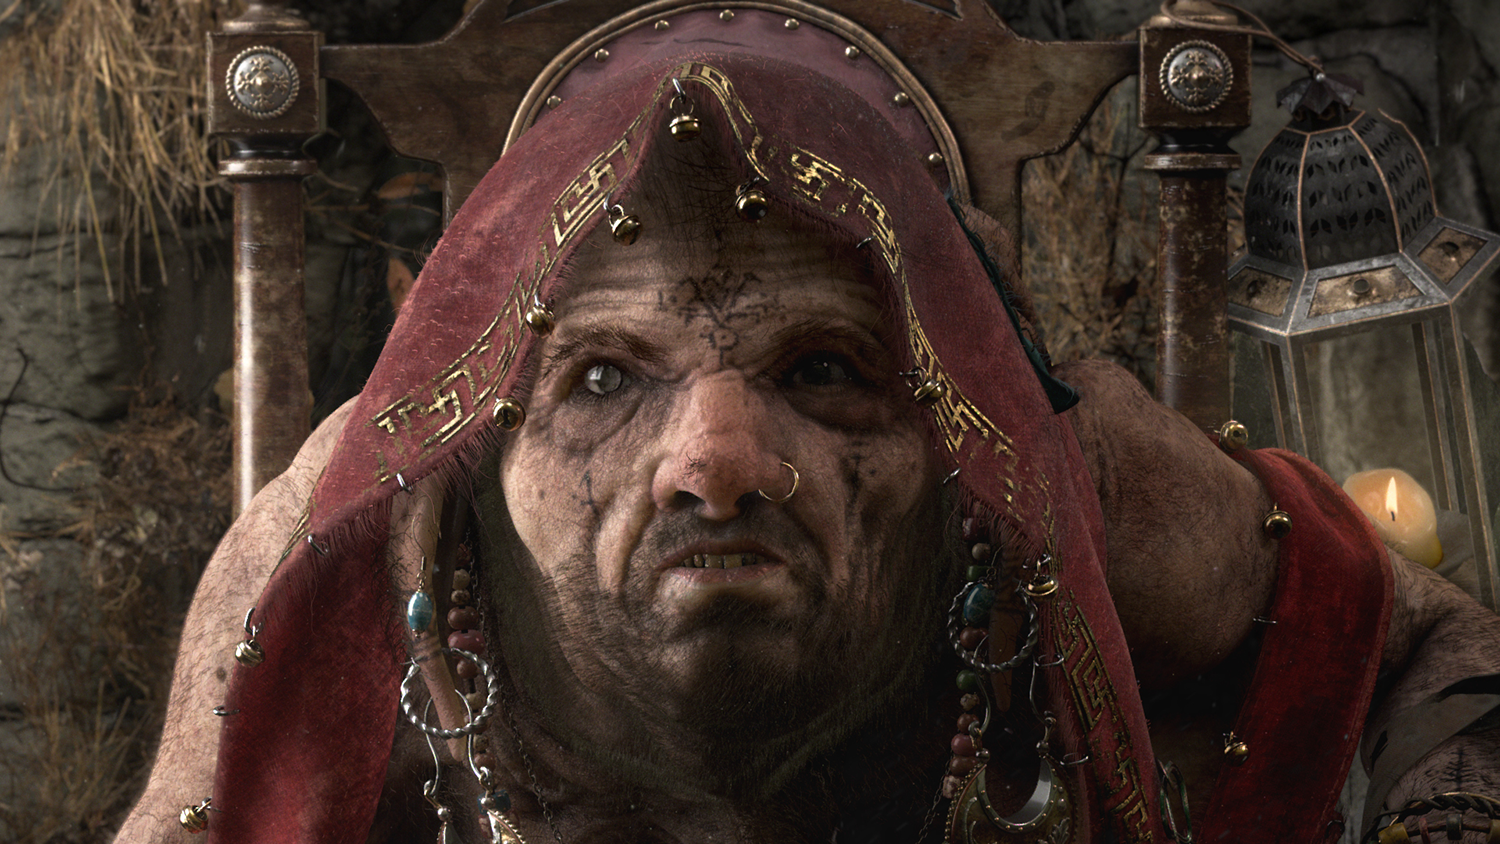
“This was the result of a few sketches I did a couple of years ago. They remained in my sketchbook for a while. I wanted to create a humanoid, the last of his kind, who had lived in different eras. This is why I included different objects in the scene from various historical eras; For example, the scriptures on the cow’s skull at his feet are taken from an old baroque document. The throne is pseudo-Victorian, the decoration on the scarf istaken from a pattern I found on a little temple at Kew Gardens in London, and the vase on the bottom right is Etruscan.I also wanted to have a slightly dusky and Rembrandt-like look, as this man has lived in solitude in an old, ruined church. From when it wasn’t. Besides, I wanted to keep a hint of caricature on his looks, but just a hint, as I didn't want the scene to be too severe and I still wanted the character to look grotesque and dirty. I also concentrated on his face and expression a lot. It had to look bicentennial, but not old and almost blind. Most of all I wanted him to have some kind of a sorry look on his face, a touch scared. The pose came later, I didn't want it to be randomly seated, so I thought it would be interesting to pose it as if he was about to stand up, in the act of pushing his weight using the left hand as a lever on the armrest.”
Once you’d blocked in your scene, what was the hardest part of it? And the easiest?
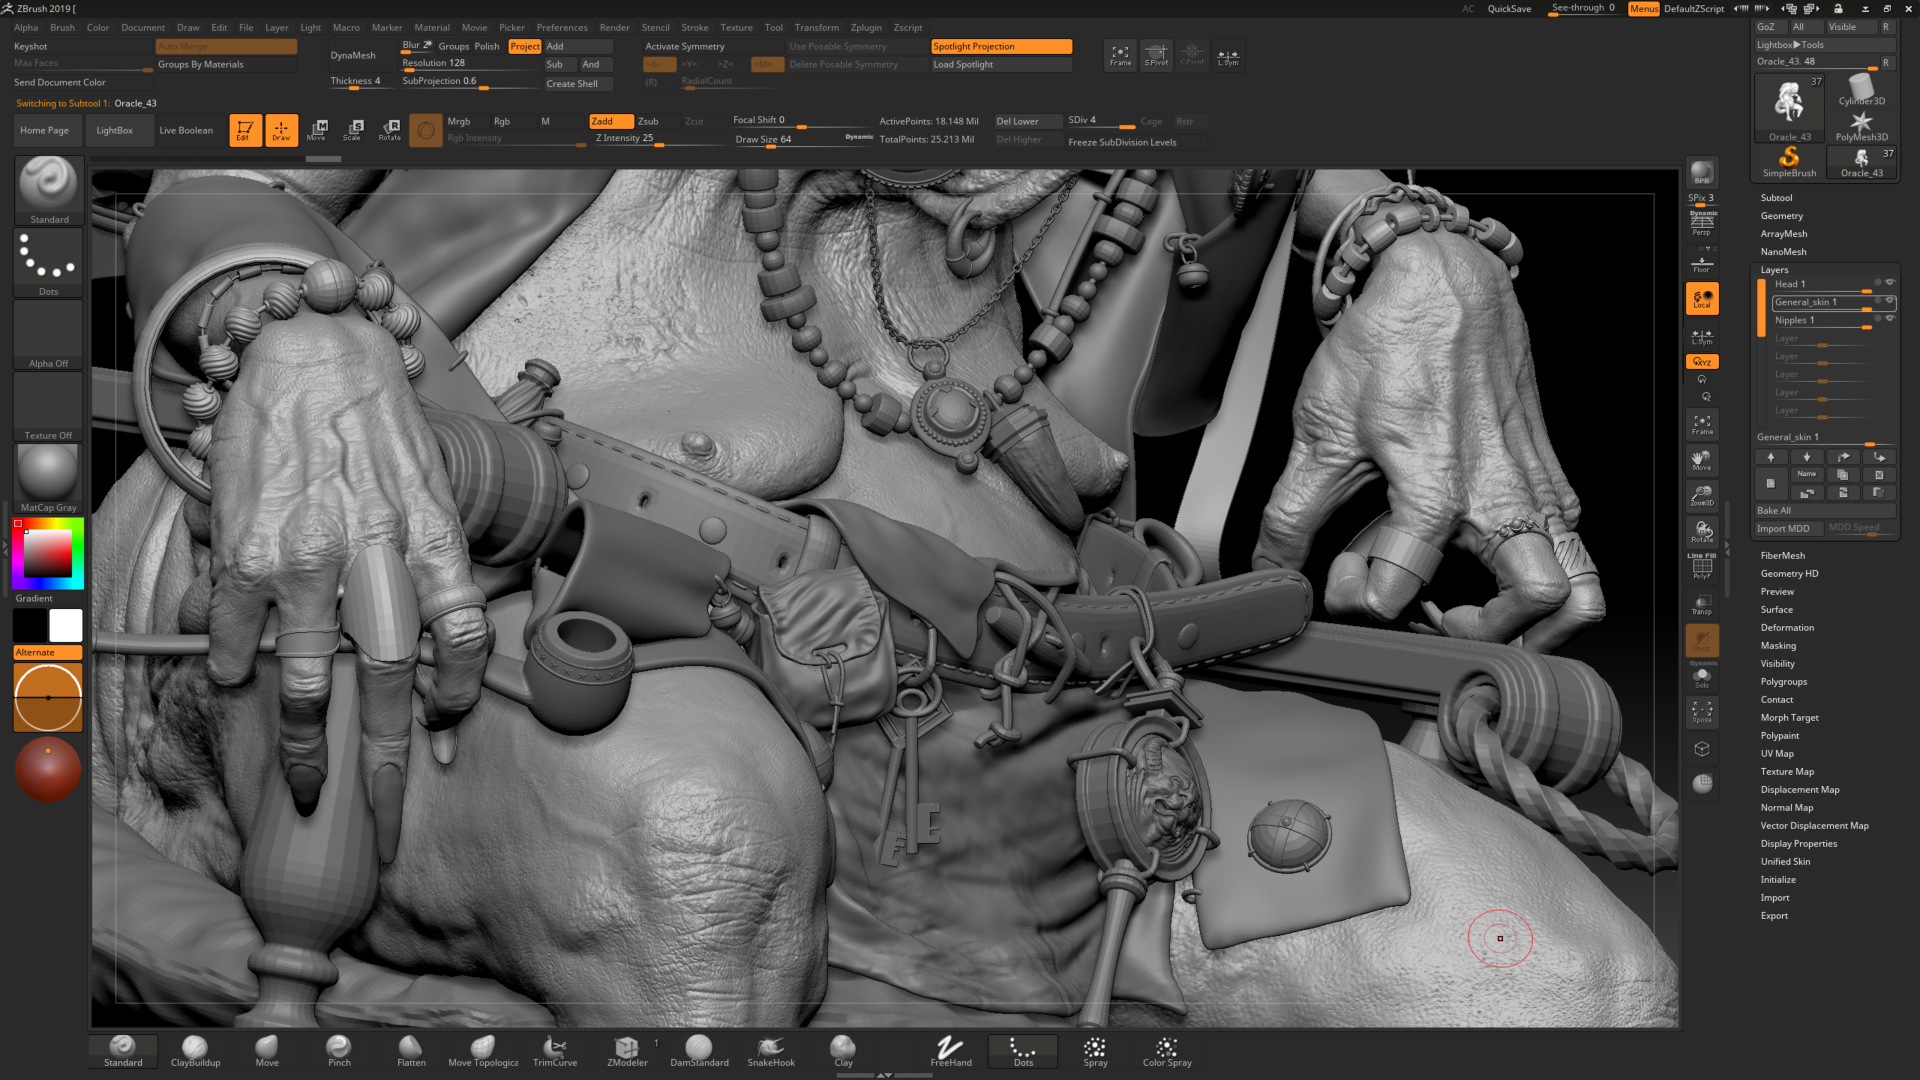
“I suppose nothing was overly complicated to model, it was just the sheer amount of assets that needed modelling which took a lot of time. I had a lot of fun modelling the jewellery, and at one point I had to stop adding stuff as he was starting to look like Mr T.
The chair was probably a bit difficult to come up with, as I had to design it from scratch and I wanted it to look like something from a particular era. I also enjoyed detailing his face and make him look a bit grotesque, I've used a lot of wrinkly faces and hands as reference and also Texturing XYZ for the tertiary details, hopefully, that came through. Oh, and Additionally I used Marvelous Designer rather than C4D for the clothing in the scene.”
Did the sheer number of components affect your UV mapping?
“Well, as you can see, the scene is full of assets, and they all needed to be UV-mapped to create the textures in Substance Painter. I think I created 74 UDIMs in total, but there are over 116 objects in the scene, not counting the background elements. RizomUV has been absolutely vital in creating such a huge number of UV-maps, I probably couldn't have done it in such a short time without it.”
How did you decide to do your UV maps? For example - how did you do the cuts on the hermit? How did you map some of the jewellery? What was hard or easy to map and why?
“The character is the one with most UDIMs as there's a UV island for each arm and leg, one for the torso and a separate one for the back. Then there’s one for the eyeballs and one for the head. I usually cut the UV on the side you don't see on camera (for example the head is cut from the top of the skull to the neck and the torso from the armpits to the pelvis). The most difficult one to UV was the head as it was not symmetrical and the topology is quite dense. I'd also say that optimising each UV of the hermit has been quite time-consuming, as his skin is very wrinkly and I had to go into the crevices and folds sometimes and use the optimise brush to have a stronger level of relaxation of the topology. The scene assets, on the other hand, were really quick to UV, apart from maybe the necklace’s cylinders: I really like things to be as randomised as possible, it really adds something to the scene. This is why I decided to add a bit of mesh displacement and variation in the poly density in C4D to the cylinders of the necklace. That backfired a bit at the UV -mapping stage as the 'Clone selection across similar islands' (Alt+C) didn't work anymore, so I had to go and unwrap them one by one.
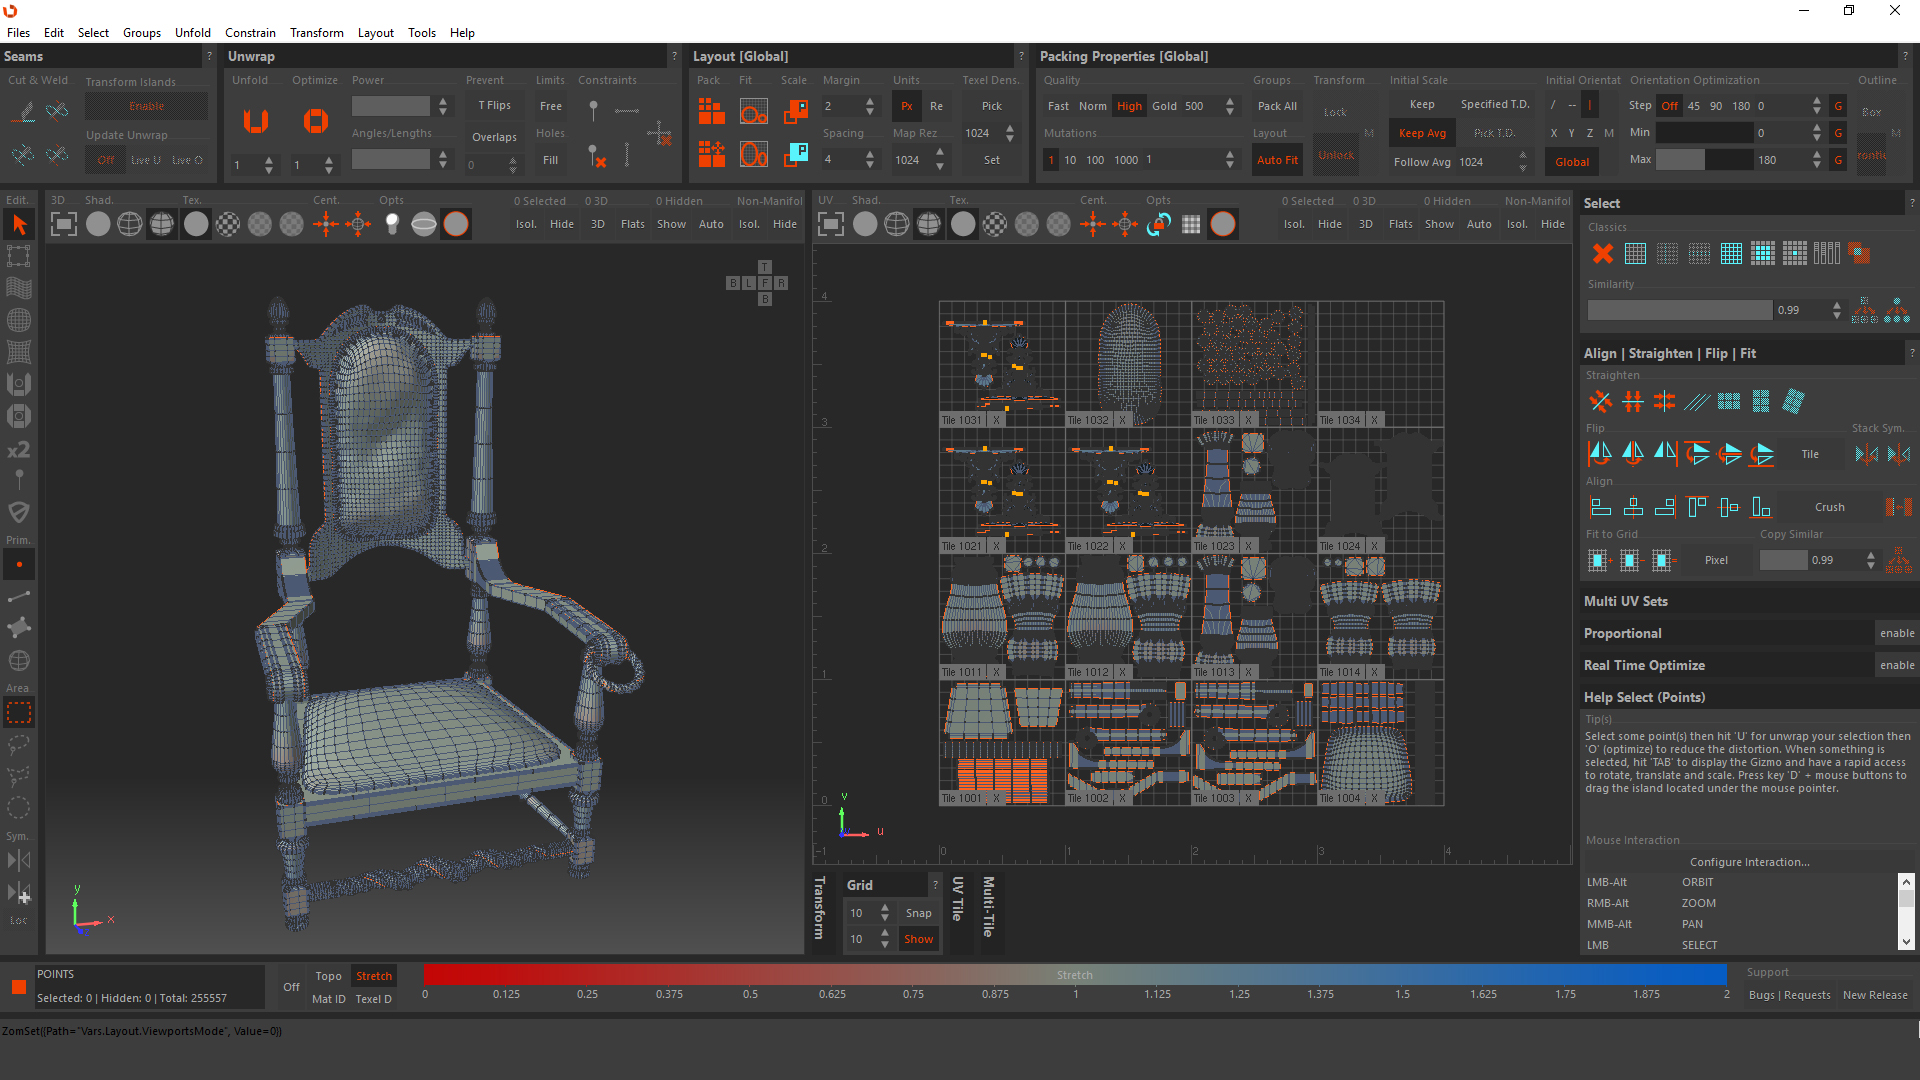
So which tool or function did you use the most in RizomUV? And why? “One of the things I really like about RizomUV is the speed with which it allows you to see results. Like everyone else I use a lot of Cut & Weld, which is something that I've never found in any other program at least with immediate response. I really like the fact that you can instantly see if the UV seems are properly cut and if not delete the seams and do them again in seconds. I also use Optimize, Layout and Packing properties a lot. These commands are such a huge help to keep things nice and tidy, especially if you are going to work in Substance Painter. I like the fact that in one click you can correctly layout your shells with a safe margin between UV islands and no overlapping.”
What was your UV/Texturing workflow like? Some artists prefer to map everything first, and others go back and forth between UV and Painter. What was yours like?
“I tend to unwrap everything in the best possible way and then create SP files for each category (Character, Rings_right hand etc...). I think I've re-uvmapped the face and the arms a couple of times, but the rest was almost done on the fly. For the very small parts, I've also used Auto seams as they didn't have to be very visible in the final render.”
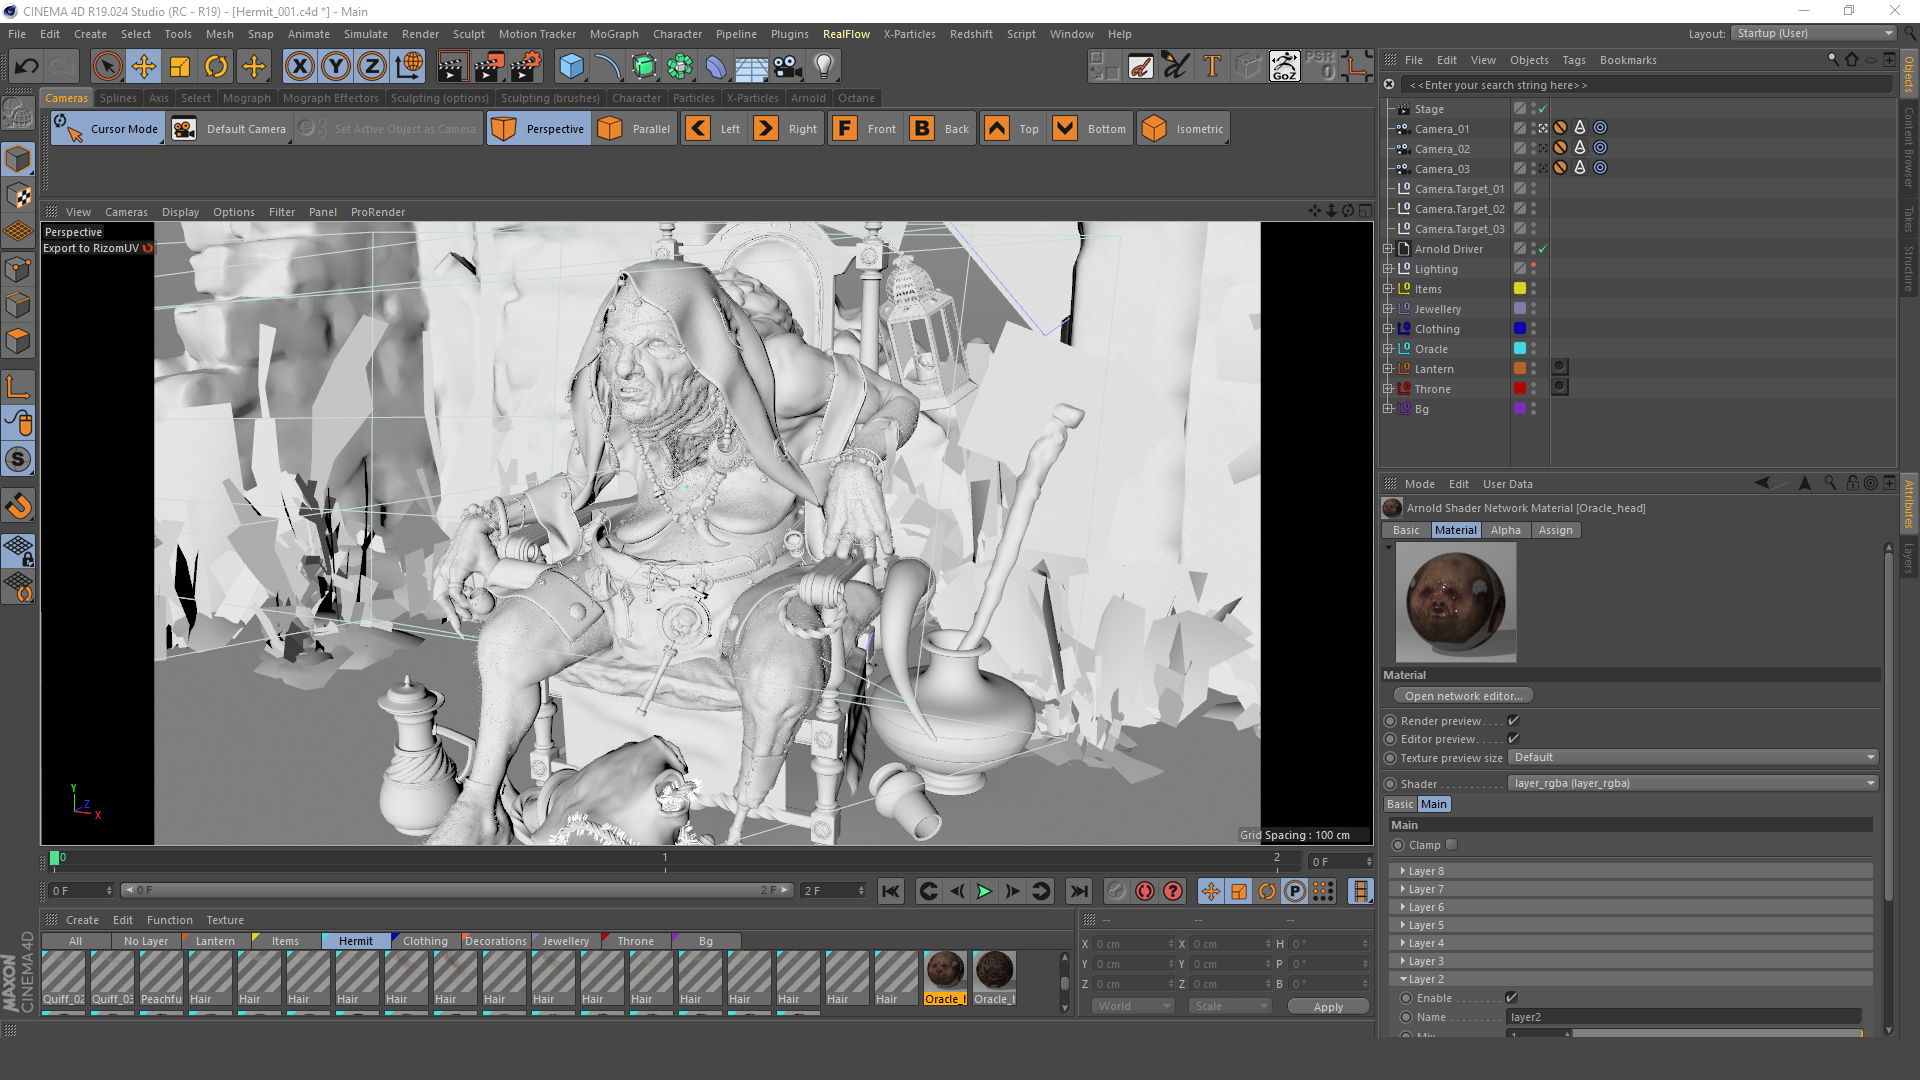
Finally, I set up my final render in Arnold for C4d. The Rizom>C4d bridge sped up things quite considerably and helped me to package up the scene pretty quick as I could jump back and forth in case something didn't work.
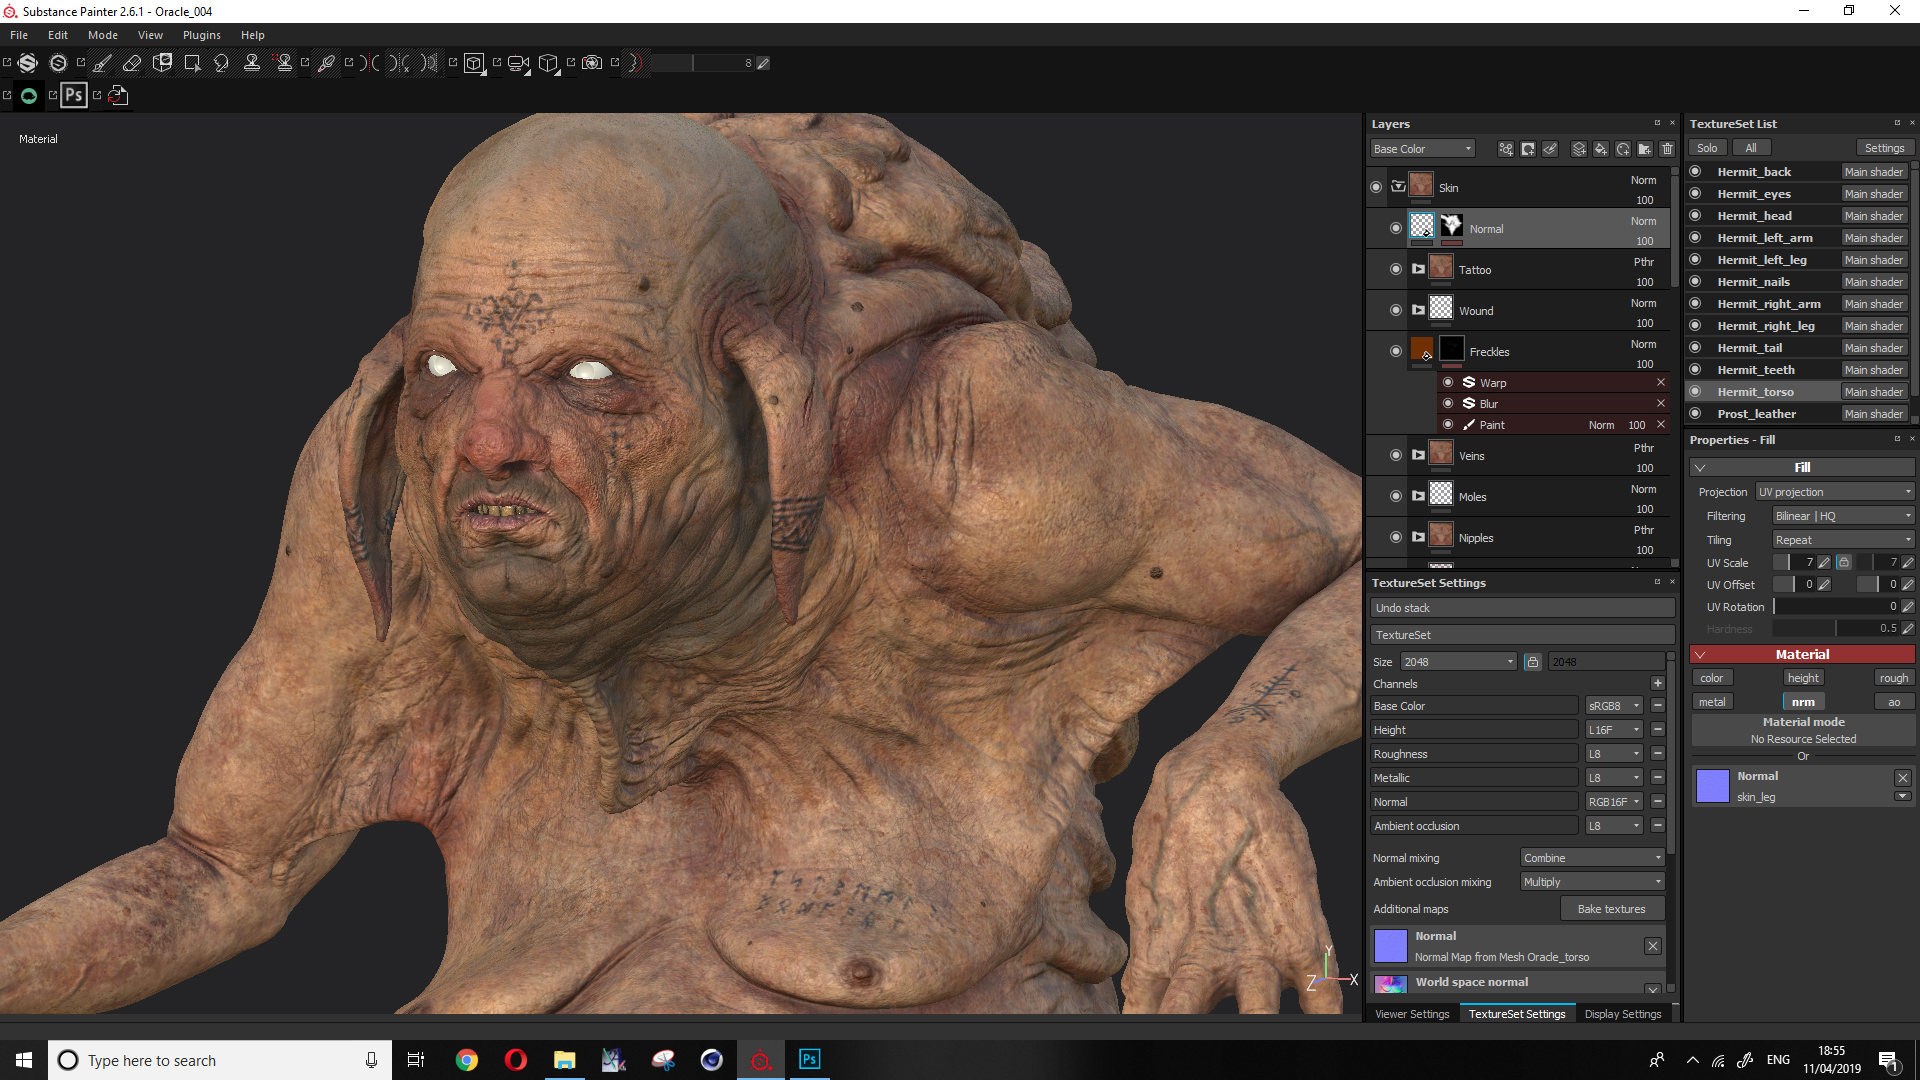
The Hermit's skin looks pretty damn good; Can you tell us about your process? It seems like you used a LOT of layers. Any tips or secrets here will be super welcome, I am sure 😊
“Thanks, years of moisturisers I guess! I usually like to add as many layers as I can for skin texturing a bit like an oil painting. I usually start with a very dark base colour, dark green or sepia (like verdaccio). In this case, I've started with the face, and that was pretty much the benchmark for the rest of the body. After the base colour, I started adding layers with randomised patches of colour (skin tones), which are later going to give you that nice "blood flowing under the skin" effect. Subsequently, I go finer and finer with details until I get to tertiary detailing with moles, veins, wounds etc. Finally, I've overlaid a lot of dirt layers and a bit of gangrene and wounds.
.
What took longer than anything else is creating the shaders and importing all the textures from Substance Painter into C4D. The total amount of maps I generated are about 396, not counting the background elements, and each shader had different parameters of specularity, SSS, height, cavity and reflectivity. The hair was also very problematic to render as it was very high poly and being a full body character, there was a lot of it going on. So, I've created different takes in C4d for the hair and its AO and comped it all together in AE – Needless to say, I had a fantastic time bringing this guy to life, but I was very happy when I was done setting up the shaders. Of course, now I can’t even look at it without focusing on imperfections and things I could’ve done better, but overall I’m happy with the result!
If you’d like to see more of Marco’s art, visit his ArtStation, his Vimeo, or Instagram